Quick Tips 2: Match Color

Today's tip is Match Color. This is an AWESOME tool that I only learned how to use a few months ago. I keep finding myself needing it, though, and I love it!

So here's the scenario: You're doing a page using a kit, and the kit does not have a ribbon in the color you want. The kit comes with a green paper, but there's no green ribbon to match. Using the color changing options, you've tried to match it but can't quite get it. How do you solve this? Match Color.

Start by opening the ribbon that is the shape you want, but the wrong color. Then open the page of the color you DO want. Make sure you have the ribbon you want to change active.

Now, go so Image> Adjustments>Match Color.
Now, where it says "source" drop down the box and choose the name of the file that you want to change the color to. In this case, I would choose ppr03 from my list. Press ok.

Now my ribbon is green!

Now, matching color does that--it matches the COLOR, not the pattern. So my ribbon is green, but it will not have the pattern my green paper had. It doesn't always work very well with changing the color of elements like flowers, etc--though you can adjust the FADE level to make it look better.

You can also do this with just a colored box. Lets say you love a certain element from a kit, and want to use it in another kit or just on it's own. Create a blank page, then draw a square shape of exactly the color you want. Flatten the image (Layer>Flatten) and crop it so that the page is all one color. Then follow the same steps.

Lesson 22: Curving Text using the Pen Tool

Curving text in Photoshop is, unfortunately, not super easy. I've really struggled with this feature. And I'm still no expert. It requires the use of the pen tool which, I'm sorry to say, is not exactly easy to pick up using. I do not claim to be an expert using this tool, but I know enough to help you learn to do a basic curve. You may have seen my earlier post about making badges. I use this curve tool a lot so that my text fits in the roundness of the badge.

First of all, there IS another way to curve your text, which is called Warp Text. Althought his method is simpler, it is also very limited. However, I would always attempt a Warp Text first and if it doesn't give you the effect you want, use the Pen tool.

Warp Text

To use Warp, just create some text to work with. When you have the text tool chosen, you will see the warp button on the text toolbar. This will bring down a menu for you to choose from.
Just select one of the features and see what it does.

With the "arc" option, you can also warp your text downward by entering a negative percentage in the bend box. Honestly, I don't think I have ever used Warp Text on a scrapbooking page, but I have used it for badges and posters that I've made.

For example, I used it when I created this little stamp for a Literacy Night at my school, where we were focusing on Fantasy novels. I then used an action from Atomic Cupcake called "rubon" to make it look stamped.

However, I do have an AWESOME example of another scrapbooker using this feature. I LOVE this page. It never occured to me to use Warp Text on an entire paragraph. Stefanie at StefStyle made this awesome page--without kits, mind you!

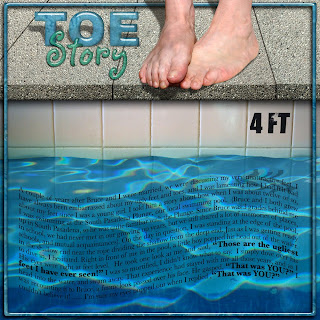
 I love this one! It's amazing! And a very funny story, too! I look at this page and feel totally incompetant. I have no idea how she did that title. And I love that she has certain important parts of the story bolded or in larger print. Brilliant.

The Pen Tool

Let me just remind you here and now that this is in no way a full tutorial on how to use the pen tool. Again--it's not my favorite tool and I've never really gotten the hang of it. But what I know should be enough for most of you who might feel a need to use it.

1. Begin by selecting the pen tool.


2. Next, click on the point where you want to BEGIN your curve.
3. Then click on the point where you want to END it.
4. Now here's the part that took me forever to figure out--when you click on the second point, DON'T UNCLICK. Immediately drag your mouse and you will see the curve between the two points. I would always unclick and then try to click in the middle to drag the curve where I wanted. Totally doe
sn't work that way.
5. Now, click on your Text tool.
6. When you drag your text cursor on top of the curve, you will see it changes slightly You'll see the I shaped cursor, but it now has a little curvy line next to it.
7. Click on your curved line, right in the middle. You will see a new diamond shaped point, and a blinking cursor. Type your text.
8. It will take several tries to get used to this--if your text is too large or too long, it won't fit. You may need to change text size, or you can CTRL+T the text box and transpose it larger. That will allow your text to fit.

Now, the pen tool allows you to make pretty much any shape. Just draw the two end points, unclick, then click and drag and the parts of the line you want to move in a wave. In this example, I did three different ones.

And with words added:

So, there's a quick tutorial on using the pen tool and warp. Hope it was helpful!

Quick Tips 1: Auto Select

So I thought I'd start a new section on my blog called "Quick tips."  I don't always have the time to do an entire lesson complete with video and everything, and there are several features in Photoshop that some people miss or don't use, and I thought I'd just do some quick tips here and there to bring them to the forefront.

Today's tip is a very, very simple one. It's called Auto-Select. I did a search on my blog and couldn't believe that in all the lessons I've taught, I've never mentioned this handy little tool!

When I first started using Photoshop, I already had a background using Fireworks, which is also a desktop publishing program and works closely with Dreamweaver to create websites. Knowing this program beforehand was very helpful in helping me understand the concepts in Photoshop, like layers. But in Fireworks, you can select any layer just by clicking on it. It drove me CRAZY that you can't do that in Photoshop. In order to select a layer, you have to either right click on the layer and choose from the pull-down menu, or you choose it from your layer toolbar on the right.

Then I found out about a handy little check-box called "Auto-Select."


Just click on the arrow tool in your toolbar.
Then check the auto-select box.
You can now select any layer just by clicking on it!

Example of How I Use it:

Although I do love this feature, it is not my default. I've grown used to the other method, and so if I have it on, I get annoyed when I suddenly move the wrong layer because I accidentally clicked on it. But I do use it a lot for things like Alphas--you've pulled in a bunch of individual letters from a kit and you are trying to spell a word. It is nice to turn on auto-select to line them up quickly. Then I select each letter in the layer toolbar (using the CTRL key as I click on each one) and then link them so I can re-size them all together. I did this recently on this page: 

(Sorry not the best copy of it--I had to get it straight from my Cherishbound page online, since I'm not at home and don't have the original file!)

Feeling Like Crap! (But for a good cause!)

Hello everyone. I wanted to update this site and let you all know that I'm sorry my posts have dropped off so much lately. And I'm afraid it might not change. I'm still going to update, but not with the same detail I have in the past. The pregnancy is one thing, but now I know that I am having TWINS!!! I'm very excited about this, but it's a huge financial and physical strain on me! I hate to say it, but the pregnancy is already kicking my butt! My first pregnancy was a piece of cake--this one is already so much harder. Right now I'm taking a half-day off work and I'm in bed on my laptop. Grr! There's so much I want to do!

Anyway, I apologize that this blog might get a little neglected for the next few months. I am still trying to finish my 2010 yearbook, and as I complete pages I will load some of them here. But I don't think I'll be doing any new lessons for awhile. Still, the beauty of this site is that the information on it is still relevent and good, and hopefully it will continue to be a resource for you as you explore the exciting world of Digital Scrapbooking! Thank you all for your support!

Megan


P.S. Won't it be fun to scrapbook pages with TWINS?? I'm so excited!!!